Price: $49.99


Shishito pepper plant is a Japanese heirloom sweet variety with a slightly smoky, spicy flavor when cooked. Although it has a low Scoville rating of just 50 to 200, the versatility and flavor profile of these small, elongated, wrinkly fruits rival hot chiles for increasing popularity with pepper lovers and gardeners. You might be surprised, occasionally, with one that matches the heat of a mild jalapeño. Shishito is an easy-to-grow pepper that adapts to vegetable gardens, raised beds, pots, and hanging baskets and can even be grown as a houseplant. It's a warm weather plant, set out in late spring or early summer when soil and air temperatures reach averages of close to 70 degrees Fahrenheit. Shishito pepper matures quickly, with harvest beginning in about 65 days. Plants are prolific for producing up to 20 fruits each. How to Plant Shishito Pepper Shishito pepper seed can be direct sown in zones 8 to 10 once soil warms to 70 degrees Fahrenheit. Plan to purchase seedlings or start seeds indoors early if you live in cooler regions. When to Plant Shishito pepper seedlings should be planted around four weeks after the final frost when the soil temperature reaches 70 degrees Fahrenheit. Average daytime temperatures arebetween 70 and 85 degrees Fahrenheit and nighttime temperatures above 55 degrees Fahrenheit is the ideal climate. For growers in cool zones, start seeds indoors 8 to 10 weeks before the final frost. Selecting a Planting Site If you're planting in the ground, in a raised bed, or pots, choose an area that receives direct sunlight all day. Shishito peppers thrive with plenty of heat and light. They need fertile, neutral to slightly acidic soil that drains well. You can also grow Shishito pepper on a sunny windowsill. Spacing, Depth, and Support To transplant a Shishito pepper seedling, dig a hole slightly wider than the rootball: 8 inches deep. Remove the lowest set of leaves and set the seedling with the crown just below the soil surface. Avoid exposing roots to direct sunlight and water well beforehand to discourage transplant shock. Space plants in the garden 12 to 18 inches apart. Leave 24 to 36 inches between plants in a raised bed. Choose a pot 12 inches deep and wide with plenty of drainage holes. At just 2 feet tall, mature peppers do not need support, but a short stake prevents a plant, heavy with fruit, from toppling over. For direct sowing, plant seeds 1/4 inch deep and 12 to 18 inches apart in the garden or 24 to 36 inches apart in a raised bed. Cover with soil. You can plant several seeds in one wide, deep deep container. It may need to be thinned to one plant depending on the pot size. Shishito Pepper Plant Care Plant strong, healthy seedlings when soil and air reach ideal temperatures to avoid potential problems. Provide plenty of sun, adequate air circulation, water and fertilizer and Shishito pepper is easy to grow. Light This heirloom pepper benefits from direct sunlight all day long. Choose a spot that gets at least eight hours daily. Soil Peppers prefer soil rich in organic matter. Add aged compost before or at the time of planting. Soil pH should be neutral to slightly acidic at 6.0 to 6.8. Water Keep seedlings slightly moist by watering every other day to support a healthy root system. Once plants have grown, once-a-week watering is usually sufficient. Avoid overhead watering, maintain consistent moisture, and don't let the soil completely dry out. Drip irrigation is an ideal method for watering peppers. If you live in a dry climate, mulching around the base keeps roots cool and hydrated. Potted plants on the patio or indoors need more frequent watering. Depending on the growing conditions, it can be as often as daily. Water deeply at the base allowing all excess to drain. Temperature and Humidity Pepper plants thrive in hot, sunny conditions. Shishito pepper grows particularly well planted at least four weeks after the final frost when average daily temperatures are between 70 and 85 degrees Fahrenheit. If you're growing this pepper indoors, add a humidifier or set the plant on a pebble tray to boost the humidity level to 40 to 60 percent. Fertilizer Fertilize Shishito pepper every four to six weeks throughout the growing season. Working compost into the planting hole is ideal or add a balanced NPK fertilizer such as 10-10-10. Bloodmeal is an organic alternative that supplies nitrogen. When flowers appear, add bonemeal or an NPK fertilizer higher in phosphorous and potassium, 5-10-10 for example, to encourage flowering and fruiting. As fruits develop, a third application of balanced fertilizer, compost, or bloodmeal helps sustain healthy growth. Shishito peppers also respond well to water-soluble organic fertilizers like fish emulsion and seaweed extract. Fertilize peppers grown in pots more frequently, every two weeks. Pollination Shishito pepper flowers are self-pollinating but, when grown outdoors, are likely to be visited by insects that transfer pollen. Wind movement among plants and insects all contribute to fruit production. If you're growing Shishito pepper indoors, you can hand pollinate or gently sweep your hand through the foliage and flowers of the plant to encourage complete pollination and support better fruiting. Harvesting Shishito Pepper Experienced growers harvest Shishito pepper while still in its green stage, around 60 to 65 days after planting. Fully ripe peppers turn red and are edible, although you might lose flavor. Pick peppers as soon as they are 3 to 4 inches long. Leaving this thin-skinned variety on the vine too long causes it to thicken and makes it less palatable. Plants continue to produce fruit for up to 45 days in optimal conditions. Harvest in the morning for the best flavor and moisture content. Grasp peppers by the stem and gently twist them to remove the stem and fruit. You can also use a snipper. If any of the stem remains attached, the pepper will deteriorate quickly. Shishito peppers can be refrigerated in plastic bags for one week. Freeze excess peppers whole or char, skin, and de-seed them before freezing if you will be cooking with them. How to Grow Shishito Pepper in Pots This pepper grows well in containers, even hanging baskets. Choose one 12 inches deep and wide and fill it with potting soil and aged compost. Potting soil that does not contain inorganic fertilizer is best for germinating seeds. Plant seed 1/4 inch deep and cover lightly. Place the pot to receive full sun and keep the soil evenly moist. To transplant a pepper seedling into a pot, fill a 12-inch deep and wide container with quality potting mix. Dig an 8-inch deep hole, slightly wider than the root ball. Remove the lowest leaves and plant the crown just below the soil level. Adding aged compost to backfill encourages healthy growth. Place pots in a spot that receives full sun daily and keep the soil consistently moist. Propagating Shishito Pepper From Seed Shishito pepper germinates reliably from seed, sprouting anywhere from one to three weeks. You need a seed starting mix and small pots or a germination tray. Fill a germination tray or small pots with moistened, soilless seed starting mix. Plant seeds 1/4 inch deep and cover lightly with the mix. Place container/s in a warm location that receives bright, direct sun. Use grow lights and heating mats or bottom heat to aid germination. Keep seeds consistently moist but avoid overwatering, which can cause them to rot. Plastic domes or other covering help contain moisture. When seeds sprout, remove plastic if you're using it. When true leaves appear and stems are sturdy enough to handle, peppers can be transplanted into full size containers. Overwintering Even though peppers are an annual plant in most zones, they are perennial plants that can be overwintered for several years. Preparing for and encouraging them into dormancy gives an earlier start to next year's growing season with a plant with an established root system. You need a clean, sterile pot, fresh potting soil, a shovel or spade, and sterile clippers. Follow these steps. Fill the bottom of a clean pot with fresh potting soil. You can use a pot the same size as the one the pepper is growing in or choose one slightly smaller. If you plan to overwinter a pepper grown in the ground, select a pot 12 inches wide and deep. Use the clippers to cut back branches leaving two or three nodes per branch and removing all foliage. Slide the pepper out of its pot. If planted in the ground, use a shovel to dig a circle 8 inches out and deep from the main stem, then lift out the plant. Gently shake off excess soil and use your fingers to comb through and feather roots. You can rinse the remaining soil off with a hose. Place the bottom of the root ball on top of the soil and start filling in around the roots until the top of the root ball is covered. Water, let excess drain, then place the pot in a cool spot (55 to 65 degrees Fahrenheit) that receives indirect sun. Continue to remove any new leaves that form during the resting or dormancy period. Dormant pepper plants don't require much water. Once every two weeks is adequate. As temperatures approach 70 degrees Fahrenheit, start exposing the plant to outdoor conditions to harden it off. Peppers with an established root system adapt quickly to outdoor conditions. Common Pests and Plant Diseases Shishito pepper is susceptible to the same pests and diseases that affect all pepper plants. Pests to watch for include aphids and hornworms. The most prevalent fungal infection is powdery mildew and may require repeated treatments for control.
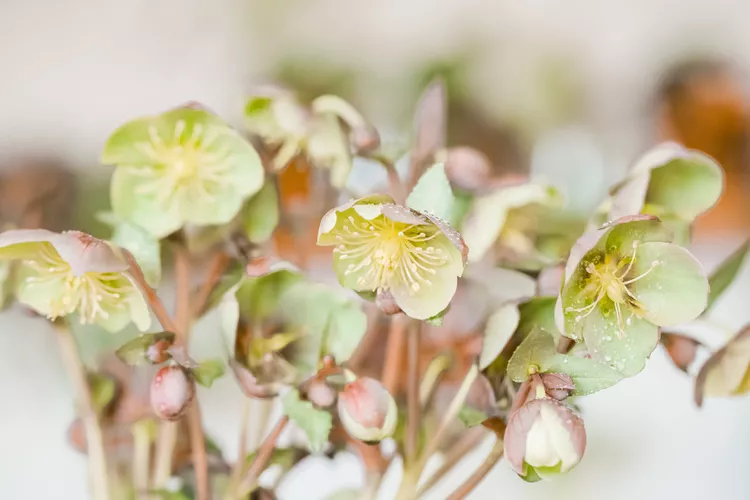
Lenten rose (Helleborus x hybridus) is not a rose; it's a perennial hybrid hellebore belonging to the buttercup family. The name origin of "Lenten rose" refers to the plant's bloom season, which is around the Christian season of Lent that falls in late winter, and its rose-like flower buds. Lenten rose thrives in partial sun to shady conditions. Plant it in moist, neutral-to-alkaline, rich soil with good drainage. Lenten rose cannot tolerate high temperatures. Lenten rose is toxic to humans and pets. Lenten Rose Care Lenten rose is one of the easiest plants to grow. Here are the main requirements: Plant Lenten rose in early fall or spring in partial to full shade, keeping them sheltered from harsh winter winds. Keep the soil moist, but don't let Lenten rose plant roots get soggy; mulch in early winter. Protect Lenten rose plants from deep freezes. Feed regularly with fertilizer or amend the soil occasionally with organic matter. Light One of the best perennials for shade, hellebores will retain their vibrant sepals and foliage in shady locations. An ideal location for Lenten rose is under the canopy of a deciduous tree, which provides shade in the summer but allows plants to receive sunlight in winter when the trees drop their leaves. They do best when they receive sun in winter but full to partial shade in summer. Soil This early spring bloomer prefers evenly moist, well-draining, fertile soil. Enrich the soil with compost to improve the vigor of the plants or fertilize them with manure tea. Water Hellebores prefer evenly moist but not constantly wet soil; soggy soil can invite disease. Provide enough water to keep the soil moist during prolonged periods of hot and dry weather, but Lenten rose can tolerate dry conditions once established. If no rain is in the forecast, you can expect new plants to need about an inch of water per week. Temperature and Humidity Although its foliage is evergreen, Lenten rose can become scorched and tattered in extremely harsh winters. The plants will need winter protection to keep them safe during deep freezes. Lenten rose requires shade if you live in a zone with intensely hot, sunny summers. It likes constant moisture and grows well in humid climates. Fertilizer Regularly amending your soil with organic matter is enough for a single specimen hellebore. However, for larger plants or a cluster of multiple plants, lightly fertilize with a slow-release, balanced fertilizer in late winter as new foliage emerges. If using liquid fertilizer, ensure it doesn't splash on the foliage because it can burn the leaves. If you accidentally splash some on the plant, use a steady stream of water to wash it off. Types of Lenten Rose Lenten rose cultivars produce blooms in various colors, but the basic plant form is identical. Other hellebore species are similar to the Lenten rose. 'Red Lady': Upward-facing, single-petal flowers with a deep red hue or white with a pink blush. 'Mrs. Betty Ranicar': Abundant snow-white double-petal blooms. 'Windcliff Double Pink': Stunning double pink flowers and mounded foliage. Helleborus niger: Commonly known as Christmas rose, this species produces white flowers, sometimes flushed with pink, that appear at Christmas time in warmer regions or in midwinter in colder climates. Helleborus argutifolius: Commonly known as the Corsican hellebore, it grows along roadsides in Corsica and Sardinia and is known for its coarse but bold evergreen foliage and pale green blooms. Pruning Allow the healthy evergreen foliage to remain on the plant throughout winter. The leaves are dark green, glossy, and look hand-like with fingers. In warmer climates, it is evergreen but will drop its leaves in colder winter climates. Remove old, scorched, damaged, or dead leaves from the plant before the plant is in bloom (usually late winter to early spring). Remove any browned and ragged foliage at its base during the growing season. When the flowers have started to brown at their tips, cut them back to the bottom of the plant. After blooming, prune Lenten rose flowering stems to their base to encourage new foliage growth. Propagating Lenten Rose Lenten rose is among the easiest plants to propagate. You can cultivate more plants through division. The best time to divide mature plants is in spring. A mature plant is about three years old and has flowered in the past. Division can make flowering more vigorous for the upcoming blooming season. Transplanted sections can develop into blooming plants in the first season, but some might not and might need the span of a growing season to recover from the shock of the division. Also, divided plants will likely bloom at least one year sooner than plants grown from seed. To propagate by division: Find a container or shady spot in your landscape or garden, a sterilized knife, and moistened, enriched, well-draining potting soil. Dig up a plant clump and divide it by cutting off a piece of the plant with a healthy root section and vigorous above-ground stems. Replant the division or place the container in a shady location. Water lightly a day or two after planting and keep moist. How to Grow Lenten Rose From Seed Lenten rose produces its seeds in the late spring. You can save seeds collected from faded flower heads for planting in summer or the following spring. Although Lenten rose is not considered invasive, if you don't deadhead its faded flowers, it can reseed, self-sow, and spread to fill an area. Their attractive foliage makes them a gorgeous ground cover. Expect Lenten rose to naturalize under the right conditions. To sow seeds, prepare an area in a shady garden bed or prepare a container with moistened, enriched potting soil. Scatter seeds on the soil surface and gently press them into the soil. Seeds must be in complete contact with the soil but do not bury them. These seeds need sunlight to germinate. Moisten the seed and soil surface. Keep the soil evenly moist, and do not let it dry out. Seeds will germinate over the winter. If not sown immediately after collecting, Lenten rose seeds require a stratification period of at least three weeks of cold for the seeds to germinate. To artificially re-create these conditions, place the seeds in a clear bag and store the bag in a refrigerator for three weeks. Overwintering Although cold-tolerant, this plant needs protection from harsh, cold winds. If the plant is exposed with no windbreak, protect the plants from cold winds with a light fabric covering or cold frame. Otherwise, it can tolerate freezing temperatures. Usually, plants grown in containers need more protection than in-ground Lenten roses. Also, in the colder regions, provide a few inches of winter mulch, which you should remove before they bloom. Common Pests & Plant Diseases Lenten rose is a deer-resistant plant, but they are occasionally susceptible to leaf spot and crown rot. Use preventative fungicides early in the growing season to reduce fungal infections. Proper spacing will also help prevent fungal diseases from spreading among plants. Lenten rose is relatively pest-free; occasional slugs or snails are the most significant threats. How to Get Lenten Rose to Bloom Lenten rose can be planted in early fall or late spring and have a lengthy bloom period. When growing a plant from seed, do not expect plants to produce blooms in the first year. It can take two or more growing seasons before flowers appear. Also, if you transplanted or divided your Lenten rose, it might not bloom for a year or two after that division. To encourage blooming, spread a bit of compost around the plant or a light dose of fertilizer in the early spring. Also, if the plant is being grown in a container, make sure the plant is not rootbound. Bloom Months Lenten rose usually blooms in February and stays in bloom until April. How Long Does Lenten Rose Bloom? Once they start blooming in winter, Lenten rose tends to stay in bloom for about eight to ten weeks. What Do Lenten Rose Flowers Look and Smell Like? Lenten rose is available in many varieties with different flower colors. The flowers have five petals that come together to form a cup shape. There are also several new double-flowering and bicolor varieties. These flowers have very little fragrance and are not particularly well-liked for their scent. Caring for Lenten Rose After It Blooms After Lenten rose finishes blooming, it does not require any unusual care. You may want to save seeds at this time or consider deadheading the plant. Deadheading Lenten Rose Deadheading Lenten rose will not encourage it to bloom further but will prevent it from self-seeding. Deadhead the spent flowers if you don't want the plant to spread in your garden. Common Problems With Lenten Rose Lenten rose is one of those plants that you can plant and forget about. If you situate it in the right spot, this plant can do the rest—and last for years. However, fungus can be a problem. Black Marks on Foliage and Stunted Growth If you notice black patches on the foliage or flowers, it could be the black death virus. This disease makes plants look stunted or deformed; plants will develop black streaks and netting patterns. As the name implies, this disease is deadly. Destroy this plant; it's not salvageable and can spread to other nearby plants. Aphids or whiteflies can spread it. Apply horticultural oil to any plant with those insects to keep the virus away from your other plants. Dry, Brown Blotches on Foliage Botrytis is a fungus that favors cooler, wet weather. It's also called gray mold. It starts as water-soaked spots on leaves and stems and evolves to form dry, brown blotches. The disease can attack the flowers in severe cases, making them unsightly and short-lived. To prevent the fungus from affecting your plant, ensure adequate spacing between plants; crowding breeds fungal issues, as does soil that is too soggy or impaired by poor drainage. To treat the condition, spread 1/2 inch of lime chips around the base of the entire plant. Yellowing Leaves Your evergreen plant might develop yellowed leaves during hot summers or harsh winters. Lenten roses can tolerate extreme temperatures but might not rebound immediately and will reflect their stress by yellowing their leaves or refusing to bloom. To encourage regrowth, trim off dead or dying leaves.

Bursting with flavor, oregano adds a robust dimension to dishes and carries health benefits. Learn when and how to harvest oregano for the best flavor and the plant's health. What Is Oregano? Oregano is an herb often used for cooking and as an antioxidant for health benefits. Its pronounced flavor is often described as herby, peppery, and minty, with an underlying faint bitterness. As a perennial, oregano will continue to grow year after year without replanting.1 Origanum. North Carolina State University Cooperative Extension. Oregano's name is derived from the Greek, and it means "beauty of the mountain." So, oregano can be grown for its appearance—no need for harvesting. Oregano develops small purple flowers that bloom during summer. Left unharvested, oregano can reach up to three feet high. Want more gardening tips? Sign up for our free gardening newsletter for our best-growing tips, troubleshooting hacks, and more! Different Types of Oregano Oregano has 45 species, but a few types are used most often:1 Common oregano (Origanum vulgare): This popular type of oregano (vulgare roughly means "common") is frequently used in tomato sauces and on pizza. It pairs well with basil and thyme. Golden oregano (Origanum vulgare 'Aureum'): Golden oregano has a milder taste than common oregano. It is often used as an ornamental plant due to its yellow foliage and pink and purple flowers. Mexican oregano (Lippia graveolens): Mexican oregano has a more lemony-minty flavor than common oregano, since it's closely related to the mint family. Though its taste is strong, the bitterness is lessened, making it a staple of Southwest and Mexican dishes. When to Harvest Oregano Oregano should be harvested during the growing season, right before or when the flowers have developed.2 "I usually harvest oregano just before it starts to flower, as that’s when the leaves have the highest concentration of essential oils, which makes them taste the nicest," says says Tom Farmer, a blogger who writes Our Country Garden. The growing season for oregano varies, but in many areas, it is from spring to early summer. Tip Though oregano is relatively pest-resistant, watch for aphids, spider mites, and thrips. Harvesting Fresh vs. Dried Oregano While milder herbs like cilantro, basil, and parsley taste better fresh than dried, oregano's bold flavor carries through into dried form. "I keep both [fresh and dried oregano] stocked for different reasons," says Lindsay Etemadipour, a holistic herbalist and the founder of Symbi. "Fresh oregano is best for dishes where a bright, fresh herb flavor is desired, while dried oregano is fantastic in recipes that benefit from a more intense, concentrated flavor," she says. "Dried oregano is ideal for soups, stews, and sauces where it has time to rehydrate and infuse its flavor into the dish." She adds that fresh oregano works well as a garnish for salads, soups, and pizzas. Harvesting Oregano for Fresh Use When harvesting oregano, snip off the tops of the stems. The stems include the leaves that will be removed for use. Below, leave at least four to six pairs of leaves per stem. This helps the oregano produce more leaves for future harvesting. "When harvesting oregano, you want to focus on three things: time of day, frequency, and maturity," Etemadipour says. "First, you want to ensure that you wait until oregano is about to flower, but not after it flowers. Once the plant flowers, the leaves will start to become bitter." Choosing the best time of day for harvesting is also critical. "You want to harvest mid-morning, after any nighttime dew has dried and before the day's heat," she says. "The herb's flavor is most potent at this time due to the oils." Farmer has a suggestion for harvesting oregano so you can get another batch. "I use sharp scissors to cut the stems just above a pair of leaves about one-third of the way down, as this allows the plant to re-shoot so I can harvest it again in a few months," he says. Tip Oregano and basil can be planted together, as they work together to keep mosquitoes, spider mites, aphids, and pests away. Harvesting Oregano for Dried Use Harvesting oregano for dried use is similar to harvesting for fresh use, but as Farmer points out, there are a couple of differences. "For drying, I aim to harvest a few more leaves, so I choose stems that are just about to flower and cut above a pair of leaves around two-thirds of the way down the stem," he says. he job isn't finished when you have collected your herbs, Farmer says. "I then bundle these stems and hang them upside down on a rack in my kitchen as it’s warm and dry. It normally takes about a week for them to dry out completely, depending on how humid it is outside." As a final step, Farmer packs the dried oregano in airtight containers until he needs it. How to Care for Oregano After Harvesting After harvesting, it's important to care for oregano to enable regrowth and for the oregano plant's continued health. "Regular harvesting helps keep the plant healthy and producing," Etemadipour says. "I usually harvest when the plant stems are about five inches tall. This will guarantee a few harvests a season." Farmer adds that water and fertilizer are important. "To keep the plant healthy after I’ve harvested it, I give it a really good water and a light feed with some liquid fertilizer. If any stems have already flowered when I come to harvest, I cut them back in the same way, discarding them, as this prevents the plant from putting all of its energy into the flowers." Tips for Harvesting Oregano Pick the right time of day, usually mid-morning. Snip the leaves rather than pulling them off by hand. Prune (or harvest) oregano to maintain health, even if you don't plan to consume the herb. Bundle the snipped stems with a rubber band, placing the band on the snipped end. If pruning for plant health only, prune aggressively: as low as 2 to 3 inches.3 For cooking use, harvest oregano around two times per year.3 Rinse the oregano right after harvesting to give it time to air-dry before use.

Get inspiring landscaping ideas and tips on plant selection, hardscaping, and seasonal upkeep.Landscaping gives your yard a polished look by adding practical elements such as paths and helps you solve problems such as poor drainage. No matter the size and shape of your yard, this is where you can find all landscaping ideas and strategies you'll need.

These easy Ground Chicken Tacos are juicy, perfectly seasoned, and perfect for hectic weeknights. They are also lightning fast, ready in about 15 minutes.

Stay hydrated with these easy infused water recipes. If you find plain ol’ H2O to be boring, consider making a pitcher of infused water that scores a hint of flavor from fresh fruit, vegetables, and herbs.

I love to get fried Oreos at the county fair every summer. Since this version cooks up quickly in the air fryer, I can enjoy my favorite summer treat all year round! Lemon zest and lemon yogurt add a burst of flavor to the batter, and a dusting of powdered sugar makes for a pretty presentation
What We're Loving Right Now